WHS setup for WebDAV Navigator
These instructions have been tested on Windows Home Server 2011 with SP1. To enable WebDAV sharing through your server follow these steps:
Enable the WebDAV Role
- Launch Server Manager
- Click on Roles in left side bar
- Scroll down to the Web Server (IIS) section
- Ensure WebDAV Publishing is enabled, enable if it isn't
Configure IIS
- Launch IIS management console
- Select your "Site" from the list on the left of sites hosted on your server.
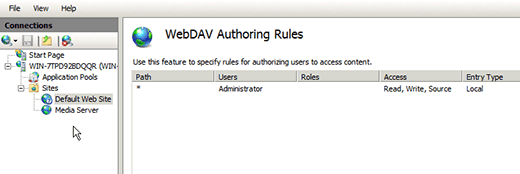
- Add a WebDAV Authoring rule for the user account you want to use to connect with

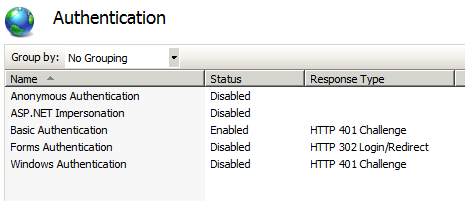
- Select the Authentication icon from the main list of sections

- Enable either Basic or Windows Authentication, and disable all the other options
- Make sure Anonymous Authentication is disabled as this will prevent WebDAV Nav from correctly authenticating
- Add a Virtual Folder called "webdav" directed at D:\ServerFolders
- Launch WebDAV Nav and enter your connection details as setup above
Download folder support
In order to support the ability to download whole folders when using IIS you need to make a configuration change to your IIS setup
- Launch the IIS management console.
- Locate your Site in the left menu
- Double click on the WebDAV Authoring option in the middle panel
- Click on WebDAV Settings in the menu panel on the right
- Look in the new list for "Allow Property Queries with Infinite Depth" and set that option to True
If you need help installing IIS on your machine you may find these instructions useful
http://learn.iis.net/page.aspx/28/installing-iis-7-on-windows-vista-and-windows-7
http://learn.iis.net/page.aspx/350/installing-and-configuring-webdav-on-iis-7/